One of the best strategies for maintaining a strong presence with your audience is to schedule Facebook posts in advance. Without the power of a reliable scheduler, it’s all too easy to let your Facebook strategy fall to the wayside and only post intermittently. Unfortunately, this lack of strategy often means that very few people will even get to see the posts you make an effort to share.
Make the most of your social media efforts by scheduling Facebook posts ahead of time. In this guide, you’ll learn how to schedule a post using two methods: the Meta Business Suite and the Simplified Content Scheduler.
Can I schedule a post on Facebook?
Yep, you schedule a post on Facebook ahead of time so that you don’t need to manually post each time you’d like to communicate with your friends and followers. While the Facebook Meta Business Suite is equipped with all the tools necessary to create and schedule posts natively within the Facebook platform, this system is not generally the most streamlined option.
Third-party solutions like Simplified make creating and scheduling Facebook posts easy and clear. Likewise, the easiest way to schedule posts to a personal account is to use a third-party tool like Simplified.
Benefits of Scheduling Facebook Posts
Does scheduling Facebook posts in advance really make a worthwhile difference? If you’re looking for ways to save time and reach your following more strategically, the answer is yes!
There are many benefits of scheduling Facebook posts in advance, including:
Maintain Consistency & Quality
A key benefit to scheduling posts in advance is to ensure a consistent posting schedule and high post quality. Scheduling ahead of time means you won’t have to worry about missing a day if you get caught up in other tasks.
By creating posts in advance, you can be more intentional about creating high-quality posts without racing against the clock.
Reach Wider Audiences
Especially if you want to reach a global audience, scheduling Facebook posts can save you significant time and effort. Instead of opening Facebook each time you’d like to post – sometimes in time zones far outside your own – you can simply load your posts into a scheduler and allow them to go live according to optimized timing.
Reach a wide audience without stretching your working hours by scheduling your Facebook posts.
Increase Efficiencies
Scheduling Facebook posts can make marketing professionals and social media managers more efficient at work. Instead of wasting time logging into Facebook accounts each time you want to post, you can schedule the week’s posts all in one day.
You can even use the Simplified bulk schedule feature to upload and schedule many posts at once. This savings on time and energy can translate to higher-quality content and improved content strategy overall.
How to Schedule a Post on Facebook Business Suite
Users with a business account on Facebook can schedule posts within the Meta Business Suite. It was previously known as the Creator Studio, and the Facebook Publishing Tool before that.
Follow these steps to schedule a post on your Facebook business page through Meta Business Suite:
- Go to your Facebook Page and choose “Meta Business Suite” from the choices on the left menu.
- If you are managing multiple Facebook pages, make sure you select the right one.
- Click the blue button below your banner that says “Create post.”
- Choose from the dropdown menus to add a Facebook video or photos depending on what type of content you need to post. Fill in the content box with your caption and hashtags. If you have linked your Instagram to Facebook, you can tailor the same post for both platforms.
- Next to “Scheduling options,” switch the “Set date and time” toggle. Use the calendar and clock sliders to select your desired timing.
- Click the blue “Schedule” button at the bottom right.
How to Schedule a Post on Facebook Personal Account
Scheduling a post on a personal Facebook account is a bit trickier than scheduling for a business page. Without using a third-party tool like Simplified, some Facebook personal accounts do not have a scheduling feature.
In order to schedule a post on a personal Facebook account natively within Facebook, users must follow these steps:
- First, set your profile to “professional mode” by clicking the three dots in the top right-hand corner of your profile page and then selecting “Turn on professional mode.”
- Open the Facebook app on a mobile phone. There is no way to natively schedule a Facebook post to a personal account from a desktop.
- Craft your post in the Facebook app, then click “Next” in the upper right-hand corner.
- Under “Scheduling Options,” toggle the “Schedule for later” option.
- Select your desired date and time.
- Click “Save,” then click “Post.”
You can always double-check that your content is scheduled or delete your scheduled post by clicking “Manage Posts” on the desktop or in the mobile app.
Pros & Cons of Scheduling with the Meta Business Suite
Meta Business Suite is a great way to manage your Facebook Business Pages, but there are some pros and cons:
Pros:
- You can manage multiple Facebook pages via Meta Business Suite.
- To schedule Facebook posts via Meta Business Suite, you need to be the admin or have permission to manage the pages.
- You can create, schedule, or post to Facebook pages via Meta Business Suite.
- The scheduling option is now available for Facebook stories and Facebook Reels.
Cons:
- Facebook doesn’t allow Meta Business Suite or any third-party Facebook scheduler to schedule posts for personal Facebook profiles.
- You can’t schedule posts via your Facebook mobile app directly. You need to have the Meta Business Suite mobile app.
- Many users report glitches in which their scheduled posts do not get published.
- You can only schedule your posts for the next 29 days.
Related: 12 Facebook Trends and the Meta: Tips, Tricks, and Useful Tools
How to Schedule Posts Using the Simplified Facebook Scheduler
For a more streamlined content creation and scheduling experience, it’s best to use a third-party tool. The Simplified Scheduler makes it easy to create, upload, schedule, and edit your posts, all in one place.
Follow these simple steps:
1. Navigate to “Social Accounts.”
In your Simplified Social Media dashboard, locate “Social Accounts” in the left-hand menu. Click on it to open a panel that will show you your connected accounts, permissions, and planner.
2. Connect your Facebook Group or Page by clicking “Add Account.”
Click the yellow button and then choose Facebook. From there, you can choose to connect to a Facebook Group, a business page, or even a personal account. Once the account is connected, you can easily create and schedule posts within Simplified.
3. Click on “Publishing,” then “New Post.”
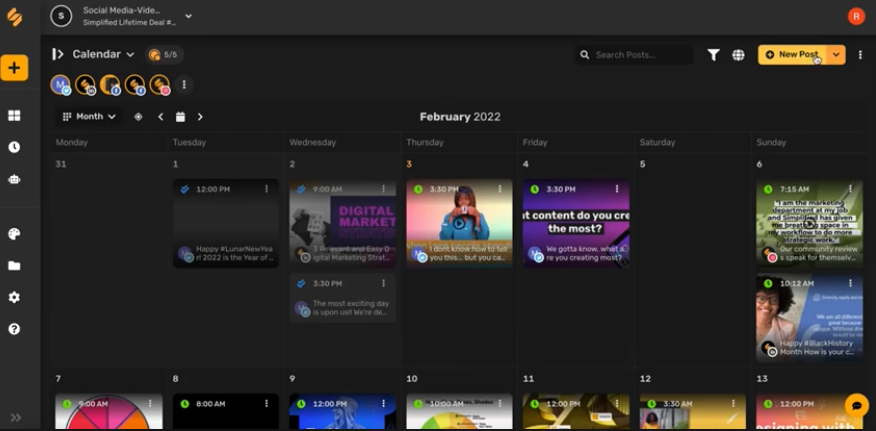
After navigating back to your social media dashboard, choose “Publishing” from the left-hand menu, then choose “New Post” in the top right corner.
4. Add your content!
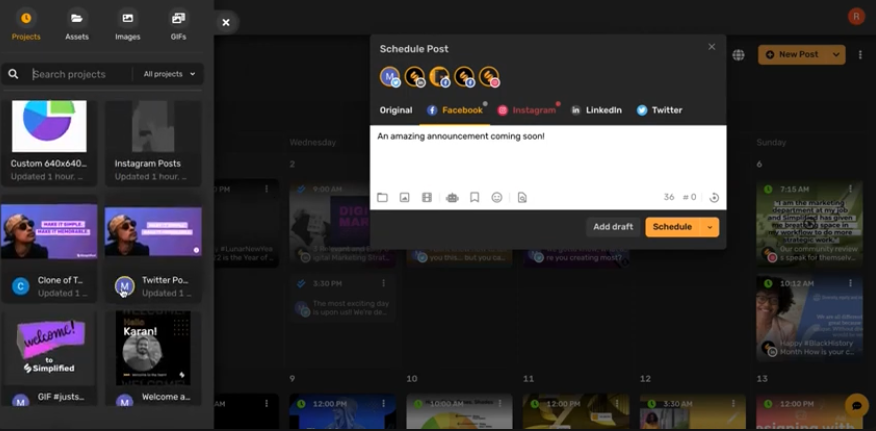
You can also create content quickly by clicking “AI Assistant” to generate fitting hashtags and captions for your post! For more templates to create Facebook Reels, AI captions, and more, navigate to the Design dashboard within Simplified.
If you’ve already created multiple posts, use the bulk upload feature to bring all of your content directly into Simplified with just a few clicks.
5. Choose your date and time.
Click “Schedule” and use the box to choose the time and date for your post publication. Use the time zone tool to ensure your post will be published at the correct time for your audience.
If you need external client review, click “Add Draft” instead of “Schedule.” From your Drafts tab, you can easily select the posts that need approval and send them directly to the client, whether or not they have a Simplified account. Either flag posts directly for clients within Simplified, or create content packages for them to review with no account required. When they approve or reject, you’ll be notified right in your Simplified account!
6. Edit and approve scheduled Facebook Posts.
Easily view your scheduled posts in the Calendar. Click on them to make edits anytime before they go live.
As your posts begin to go live and you see more audience engagement, easily manage all of your social inboxes directly through Simplified!
Related: How to Schedule Facebook Reels in 4 Easy Steps
How to Schedule Posts Using the Simplified Chrome Extension
Simplified Chrome Extension lets you post any content that you find on the internet straight to your content calendar without the need to leave the current website you’re browsing.
- Go to the Chrome web store to search for extensions and look for Simplified One App.
- Click “Add to Chrome” and select “Add extension” to place a shortcut on your top toolbar.
- Click on the puzzle piece icon, go to Simplified One App, and click the thumbtack icon.
- Browse the internet and find any content that you’d like to share on social media.
- Click the Simplified icon on your top toolbar and automatically create a post to schedule your chosen content to your Simplified calendar for any of your connected platforms.
This amazing feature makes it super easy to post anything on the internet with just a few clicks. You don’t even have to open a different tab to be able to share on your social accounts.
Simplified Facebook Scheduler Key Features
- You can connect several accounts from different social media platforms, not just Facebook. Compatible platforms include:
- Instagram Business
- Google Profile
- YouTube
- You can simultaneously create a post for different accounts and platforms. Simply select the platforms you’d like to post to and multiply your efforts instantly!
- There’s no need to change tabs if you want to post for a different social media account.
- Your simultaneous posts can be scheduled at the same time or at different times, you just have to choose to customize the time for each post.
- You can easily see the content calendar by clicking on the calendar tab.
- When you click a day on the calendar, you can see all the times of the day that you can post.
- Choose your ideal planner layout with monthly, weekly, and daily options.
- You can create your posts right from the Content Calendar.
- The Simplified AI contentval feature allows you to get posts approved directly within the platform, eliminating frustrating back-and-forth.
- You can creator tool can help you write the perfect captions and hashtags in seconds.
- You can upload your own designs straight from Simplified design templates.
- The client appro manages all of your social inboxes in one place – no more clicking through countless tabs to keep up with all of your follower engagement!
- Amazing feature: A Google Chrome Extension that lets you post anything you find on the internet!
Tips for Scheduling Facebook Posts
In order to make the best use of exciting tools like the Simplified Facebook Scheduler, define your strategy for engaging with your audience thoughtfully. Keep these tips in mind to make the most of your Facebook posting efforts.
1. Schedule Posts for the Right Time
Pay close attention to the best time to schedule your posts. To determine the right timing, consider factors such as:
- Where most of your audience is located and their corresponding time zone
- What time of day you see the most engagement
- The age group of your audience and when that age group is typically online
This process may require a mix of research and data analytics. While helpful breakdowns about average activity for certain age groups and other audience demographics can be found online, only your specific engagement insights can tell you about your particular audience and their engagement times.
2. Stay Consistent
Your audience should be able to identify your posts and graphics almost instantly, without even seeing your username. Whether you share infographics, photos, long-form captions, or helpful resources, ensure that every post follows your recognizable voice and branding patterns.
From the colors in your graphics to the tone of each caption, your followers should easily identify a consistent brand behind your posts as a whole.
3. Don’t Schedule Too Far in Advance
Scheduling Facebook posts in advance is a helpful strategy for staying consistent and visible, but overusing this ability can be a mistake. One crucial element of successful posts on any social media platform is relevance. From using trending sounds in your videos to responding to the latest current events and popular conversations, you’re best able to create relevant content when you schedule for the near future.
Consider scheduling evergreen content like tips and brand-specific updates a bit further out, but leaving space in your posting schedule to share the week’s most relevant content and jump on Facebook trends as well.
More About Scheduling Facebook Posts
The Facebook platform sees constant changes and updates, so even the most social media-savvy marketing professionals may run into confusion in the following areas.
Why are my Facebook scheduled posts not working?
Unfortunately, the Facebook site and many third-party tools are not always reliable. Whether you’ve encountered a glitch in your tool of choice or run into an error on Facebook, realizing that the post you meant to schedule never went live can be frustrating.
Consider setting up an accountability system like entering the “Manage Posts” section regularly to be sure that your social media scheduler is accurately reflected. With Simplified, viewing, confirming, and editing your scheduled posts is as easy as navigating to your Calendar!
Why can’t I schedule a post on Facebook?
Facebook has made recent changes that add extra steps when trying to natively schedule posts. If you’d like to schedule a post to your Facebook business page, instead of navigating to your profile page or creating your post directly from the home page, you’ll need to open Meta Business Suite. Once there, you should be able to create and schedule a Facebook post.
For personal Facebook pages, the most common obstacle is the “professional mode” setting. If you have not switched your profile to “professional mode,” you will not have the capability to schedule posts to your personal Facebook page.
Additionally, even once you have turned on professional mode, you will only be able to schedule posts for your personal Facebook page from the mobile app.
How do you see scheduled posts on Facebook?
To view or edit your scheduled Facebook posts, simply navigate to Meta Business Suite from your Facebook business page. From there, you can either click “Planner” or “Content.”
For a personal Facebook page, you’ll need to click “Manage posts.” This view will include both your live posts and your scheduled ones.
For the easiest experience viewing and editing your scheduled Facebook posts, head to Simplified! From the calendar view, you can easily see all of your scheduled content and tweak content and timing to your heart’s desire.
Related: How to Schedule Facebook Reels in 4 Easy Steps
Start Scheduling Your Facebook Posts
Make the most of your social media efforts by strategically scheduling your Facebook posts. Skip the ever-changing and often-confusing Facebook platform and leverage the streamlined power of Simplified.
With user-friendly tools to help you write, design, schedule, and edit your Facebook content, Simplified paves the way for a stress-free and successful Facebook presence.
PS: You can also schedule Facebook posts using Postfity (by Simplified).









![13 Project Management Software & Tools for Creative Agencies [Free & Paid] 13 Project Management Software & Tools for Creative Agencies [Free & Paid]](https://siteimages.simplified.com/blog/Advertising-Agency-Project-Management-Softwares-01.png?auto=compress&fit=crop&fm=png&h=400&w=400)


![How to Find Your Drafts on Instagram: Posts, Reels & Stories [2025] How to Find Your Drafts on Instagram: Posts, Reels & Stories [2025]](https://siteimages.simplified.com/blog/How-to-Find-Your-Drafts-on-Instagram-Ultimate-Guid-01-1.png?auto=compress&fit=crop&fm=png&h=400&w=400)


![20+ Top monday.com Alternatives In 2025 [Free & Paid] 20+ Top monday.com Alternatives In 2025 [Free & Paid]](https://siteimages.simplified.com/blog/Top-Project-Management-Tools-01-1.png?auto=compress&fit=crop&fm=png&h=400&w=400)


